
I use Ubuntu as development machine. The upgrade to Ubuntu Hardy with app armor enabled causes MySQL to encounter installation problems.
Apparently this bug which is encountered upon changing MySQL data directory is not yet solved. So I also submitted same report.
To temporarily solve this until App Armor is properly configured for MySQL, disable the App Armor using the commands below:
sudo /etc/init.d/apparmor stop
sudo update-rc.d -f apparmor remove
|
Printed copies available, email rbahaguejr [at] gmail [dot] com
|
Showing posts with label Ubuntu. Show all posts
Showing posts with label Ubuntu. Show all posts
Saturday, April 26, 2008

Saturday, April 19, 2008
Ubuntu Hardy on Lenovo G400
Below are the features of this machine:
* Intel Pentium Dual Core T2080
* 1.73Ghz, 533MHz FSB, 1Mb L2 Cache
* Intel 943GML Chipset
* 2GB 667MHZ DDR2
* 120GB SATA HDD
* CD-RW/DVD-RW Tray-in Rambo
* 14 WXGA (1280x800) TFT LCD
* Intel GMA 950 Graphics
* 56K V.92 designed modem; 10/100 Ethernet LAN
* Broadcom wireless adapter, BCM94311MCG
* 4-in-1 Card Reader
* 6Cell Li-Ion Battery
* 2.35Kg Weight
Installing Ubuntu Hardy Beta was not a problem. Only the Broadcom wireless adapter was the stopper.
Here are some pointers to make the wireless adapter work on Ubuntu 8.04 Hardy Beta.
1. We will be using ndiswrapper. I tried the native driver for a few test but it does not work properly.
2. These pointers were taken from ubuntu1501.com and help.ubuntu.com.
3. Create init scripts. Open the Terminal and run sudo gedit /etc/init.d/wirelessfix.sh. Copy the following lines.
#!/bin/bash
modprobe -r b44
modprobe -r b43
modprobe -r ssb
modprobe -r ndiswrapper
modprobe ndiswrapper
modprobe b44
4. On the Terminal make the init script executable using sudo chmod 755 /etc/init.d/wirelessfix.sh
5. Make the script run during boot up, sudo update-rc.d wirelessfix.sh defaults
6. Install needed packages and windows drivers.
sudo apt-get install ndiswrapper-utils-1.9 ndiswrapper-common
wget http://ftp.us.dell.com/network/R140747.EXE
7. Reboot your machine.
8. Unzip the downloaded R140747.EXE using unzip -a R140747.EXE
9. cd DRIVER/
10. Install the windows driver using sudo ndiswrapper -i bcmwl5.inf and sudo ndiswrapper -l. The last command should indicate detection of the adapter like
bcmwl5 : driver installed
device (14E4:4311) present (alternate driver: bcm43xx)
11. Finish everything with sudo ndiswrapper -m and sudo modprobe ndiswrapper
12. Reboot your machine. The fn+f5 key should now work and your the nearest wireless networks should now be detected.
13. To connect to the wireless network follow the Basic Procedure in Connecting to the Internet from help.ubuntu.com
14. End. Hardy has been stable about a month ago. I've been using it on another laptop.
* Intel Pentium Dual Core T2080
* 1.73Ghz, 533MHz FSB, 1Mb L2 Cache
* Intel 943GML Chipset
* 2GB 667MHZ DDR2
* 120GB SATA HDD
* CD-RW/DVD-RW Tray-in Rambo
* 14 WXGA (1280x800) TFT LCD
* Intel GMA 950 Graphics
* 56K V.92 designed modem; 10/100 Ethernet LAN
* Broadcom wireless adapter, BCM94311MCG
* 4-in-1 Card Reader
* 6Cell Li-Ion Battery
* 2.35Kg Weight
Installing Ubuntu Hardy Beta was not a problem. Only the Broadcom wireless adapter was the stopper.
Here are some pointers to make the wireless adapter work on Ubuntu 8.04 Hardy Beta.
1. We will be using ndiswrapper. I tried the native driver for a few test but it does not work properly.
2. These pointers were taken from ubuntu1501.com and help.ubuntu.com.
3. Create init scripts. Open the Terminal and run sudo gedit /etc/init.d/wirelessfix.sh. Copy the following lines.
#!/bin/bash
modprobe -r b44
modprobe -r b43
modprobe -r ssb
modprobe -r ndiswrapper
modprobe ndiswrapper
modprobe b44
4. On the Terminal make the init script executable using sudo chmod 755 /etc/init.d/wirelessfix.sh
5. Make the script run during boot up, sudo update-rc.d wirelessfix.sh defaults
6. Install needed packages and windows drivers.
sudo apt-get install ndiswrapper-utils-1.9 ndiswrapper-common
wget http://ftp.us.dell.com/network/R140747.EXE
7. Reboot your machine.
8. Unzip the downloaded R140747.EXE using unzip -a R140747.EXE
9. cd DRIVER/
10. Install the windows driver using sudo ndiswrapper -i bcmwl5.inf and sudo ndiswrapper -l. The last command should indicate detection of the adapter like
bcmwl5 : driver installed
device (14E4:4311) present (alternate driver: bcm43xx)
11. Finish everything with sudo ndiswrapper -m and sudo modprobe ndiswrapper
12. Reboot your machine. The fn+f5 key should now work and your the nearest wireless networks should now be detected.
13. To connect to the wireless network follow the Basic Procedure in Connecting to the Internet from help.ubuntu.com
14. End. Hardy has been stable about a month ago. I've been using it on another laptop.
Friday, March 07, 2008
Wednesday, February 20, 2008
Missing NTFS partition in Ubuntu
Madalas ito mangyari kapag:
1. Hindi maayos ang shutdown ng Windows system sa mga naka-dual boot. Ang shortcut sa Ubuntu desktop ay nawawala.
2. Hindi talaga awtomatikong ma-imount na Ubuntu ang ntfs partition
Maaaring manwal na imount ang partition gamit ang mount command.
1. Hanapin ang partition sa Ubuntu. Gamitin ang dmesg na command. Maaring palitan ng hda ang sda sa ibaba.

Sa itaas, ang sda1, sda2, sda3 ay mga primary partition. Ang sda4 ay logical patition na nakahati pa sa at .
2. Matapos makita kung alin nga ang ntfs partition, gamitin na ang mount command. Ang nfts partition sa itaas ay ang sda1. sundan ang mga command sequence.

Ang huling command ay gagawa ng link sa Desktop ng nyork user.
1. Hindi maayos ang shutdown ng Windows system sa mga naka-dual boot. Ang shortcut sa Ubuntu desktop ay nawawala.
2. Hindi talaga awtomatikong ma-imount na Ubuntu ang ntfs partition
Maaaring manwal na imount ang partition gamit ang mount command.
1. Hanapin ang partition sa Ubuntu. Gamitin ang dmesg na command. Maaring palitan ng hda ang sda sa ibaba.

Sa itaas, ang sda1, sda2, sda3 ay mga primary partition. Ang sda4 ay logical patition na nakahati pa sa
2. Matapos makita kung alin nga ang ntfs partition, gamitin na ang mount command. Ang nfts partition sa itaas ay ang sda1. sundan ang mga command sequence.

Ang huling command ay gagawa ng link sa Desktop ng nyork user.
SMS about Ubuntu
I posted this how to for a friend having problems with his pppoe connection to bayantel dsl.
Yesterday, we got this sms;
Another happy user of Ubuntu. He is an Italian guy using Suse before the Demo session a few weeks ago.
Yesterday, we got this sms;
I call you twice just to say that Ubuntu is running very well, it is connecting in internet. Salamat po!!!.
Another happy user of Ubuntu. He is an Italian guy using Suse before the Demo session a few weeks ago.
Monday, February 04, 2008
Connecting Ubuntu to ADSL (Bayantel Subscription)
If you have a broadband adsl connection (in my case, i am a Bayantel subscriber) Ubuntu comes with a software to be able to connect with the provider in case you don't have a router.
1. Go to Applications -> Accessories-> Terminal. This will launch the terminal.
2. Run pppoeconf. This is the software to be used to dial-up to the provider.
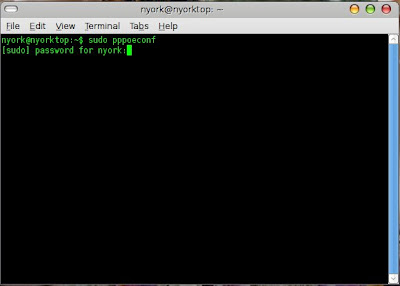
3. Select "yes" when asked if all devices were found. Use tab and enter keys to navigate or enter to select.
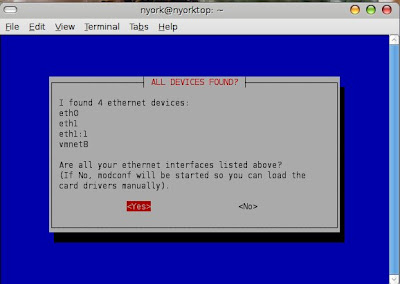
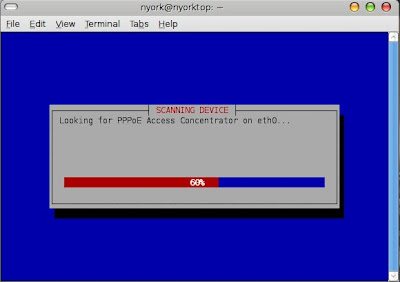
This will scan the selected ethernet device for pppoe.
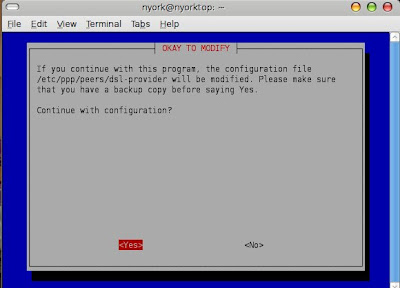
4. Allow pppoeconf to modify /etc/ppp/dsl-provider file.
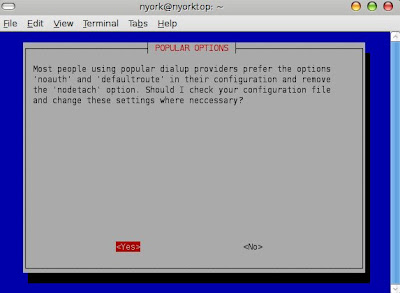
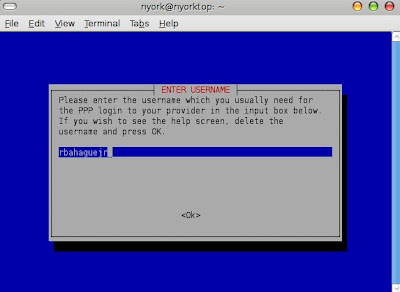
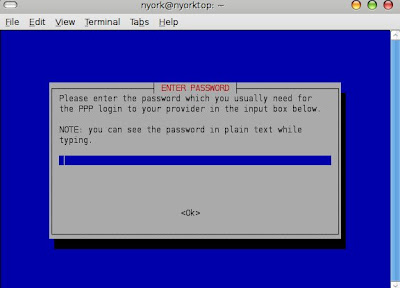
5. Enter your username and password. For bayantel, this is usually given during installation.
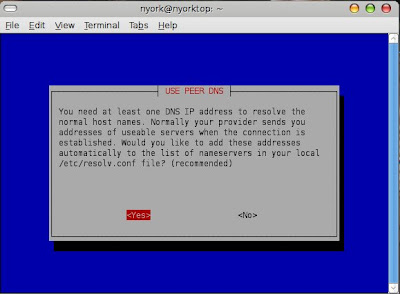
6. Allow pppoeconf to configure DNS file, /etc/resolv.conf. By default it will fetch settings during successful dial-up.
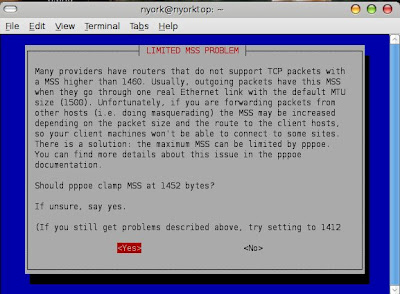
Accept "yes" for if asked whether to clamp MSS at 1452 bytes.
7. Configuration is now finished. Take note of some warnings. Copy some of them if needed.
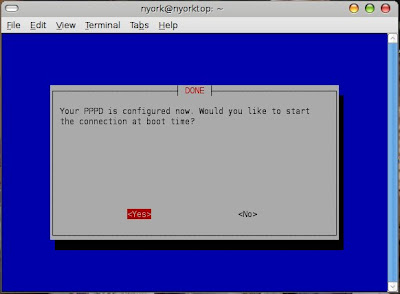
If you are exclusively using your machine to directly connect to dsl, it may be appropriate to have pppoeconf launch during boot time. But if you have a laptop, I suggest you do manual connection by selecting no on the part above.
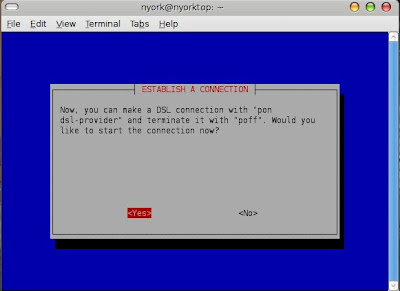
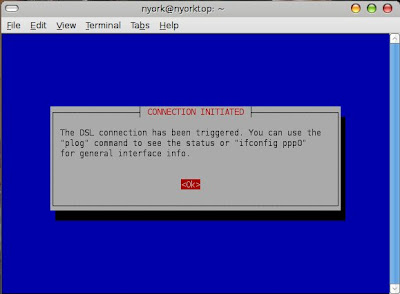
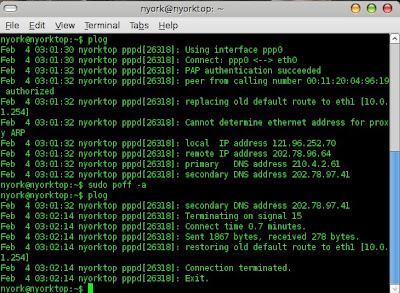
8. To monitor connection use the plog command. To disconnect use the poff command. They are both shown on the figure below.
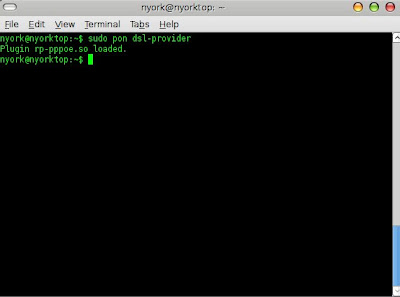
9. To reconnect, use the pon command. Everytime a dsl connection will be established, the terminal should be launch and use the pon command as shown. This is applicable if pppoeconf was not configured to run at boot time in step 7.
1. Go to Applications -> Accessories-> Terminal. This will launch the terminal.
2. Run pppoeconf. This is the software to be used to dial-up to the provider.

3. Select "yes" when asked if all devices were found. Use tab and enter keys to navigate or enter to select.

This will scan the selected ethernet device for pppoe.

4. Allow pppoeconf to modify /etc/ppp/dsl-provider file.


5. Enter your username and password. For bayantel, this is usually given during installation.


6. Allow pppoeconf to configure DNS file, /etc/resolv.conf. By default it will fetch settings during successful dial-up.

Accept "yes" for if asked whether to clamp MSS at 1452 bytes.

7. Configuration is now finished. Take note of some warnings. Copy some of them if needed.

If you are exclusively using your machine to directly connect to dsl, it may be appropriate to have pppoeconf launch during boot time. But if you have a laptop, I suggest you do manual connection by selecting no on the part above.


8. To monitor connection use the plog command. To disconnect use the poff command. They are both shown on the figure below.

9. To reconnect, use the pon command. Everytime a dsl connection will be established, the terminal should be launch and use the pon command as shown. This is applicable if pppoeconf was not configured to run at boot time in step 7.

Sunday, February 03, 2008
gOS Impressions (a review)
Malamang narinig na ninyo ang gOS. Una itong inakala na google OS dahil sa suporta sa mga online applications ng google tulad ng Google Docs, blogger, maps at iba pa. Lumikha din ito ng balita dahil sa pagkaka-install nito sa murang Everex PC ng binenta sa Walmart sa US sa halagang $200 (mga P9,000).
Ang gOS ay derivative din ng Ubuntu. Sa ngayon, karamihan sa mga linux distribution ay nakabase na sa Ubuntu. Ang hindi lang gaanong sinasabi ng Ubuntu, ang Ubuntu mismo ay base sa Debian GNU/Linux. Lahat sila ay nakikinabang sa maayos ng Debian distribution.
Matapos ang isang araw na download sa torrent, nasa ibaba ang ilang screenshots gamit ang vmware.

Ang gOS ay gumagamit ng enlightenment window manager. Mas magaan ito kung ihahambing sa gnome ng Ubuntu. Ang mga applications ay hindi rin naiiba sa Ubuntu. Liban sa emphasis sa mga online applications.
Ang larawan sa itaas ay katulad ng installation ng Ubuntu. Papipiliin din ang gumagamit mula sa ilang options. Kung siguradong walang problema sa video card, maaaring gamitin ang default na option tulad ng nasa larawan.
Ang berdeng background ay maghahanda ng pag-boot ng gOS.

Malinis na desktop ang makikita sa pagboot ng gOS. Nasa ibaba, gamit ang tila idock ng Mac, ang avant-window-manager, ang mga madalas gamiting applications. Karamihan sa mga ito ang mga online applications. Ngunit huwag madismaya. Ang mga usual ang desktop applications ay matatagpuan pa rin sa gOS. Mag-right click o left click upang lumabas ang menu. O kaya pindutin ang G sa itaas upang lumabas ang menu tulad ng nasa Ubuntu.

Maaring dagdagan ang mga gadgets sa itaas. Maililipat din ang mga gadgets gamit ang shelf configuration.

Matapos mainstall ang una kung tiningnan sa Administration ay kung maaaring magamit ang Ubuntu repositories. Sa synaptic makikitang naka-configure nga ito upang maggamit ang maraming software sa Ubuntu univers, main, etc.

Matapos ang gamitin makikita ang magandang shutdown sequence.


Gamit ang gOS, maaaring makatulong ito upang buhayin ang mga Pentium III na laptop at desktop. Kailangan pa masubukan kung kakayanin ito ng mga Pentium II. Ganundin sa mga computers na may mababang memory. Sa karanasan, ang Ubuntu ay nakakatuwa lamang kapag 512MB at bago ang processors. Kung mag-iinstall sa mga newbies baka mabagot lamang sila. Ngayon maaaring gamitin na ang gOS sa mga ganitong pagkakataon.
Ang gOS ay derivative din ng Ubuntu. Sa ngayon, karamihan sa mga linux distribution ay nakabase na sa Ubuntu. Ang hindi lang gaanong sinasabi ng Ubuntu, ang Ubuntu mismo ay base sa Debian GNU/Linux. Lahat sila ay nakikinabang sa maayos ng Debian distribution.
Matapos ang isang araw na download sa torrent, nasa ibaba ang ilang screenshots gamit ang vmware.

Ang gOS ay gumagamit ng enlightenment window manager. Mas magaan ito kung ihahambing sa gnome ng Ubuntu. Ang mga applications ay hindi rin naiiba sa Ubuntu. Liban sa emphasis sa mga online applications.
Ang larawan sa itaas ay katulad ng installation ng Ubuntu. Papipiliin din ang gumagamit mula sa ilang options. Kung siguradong walang problema sa video card, maaaring gamitin ang default na option tulad ng nasa larawan.
Ang berdeng background ay maghahanda ng pag-boot ng gOS.

Malinis na desktop ang makikita sa pagboot ng gOS. Nasa ibaba, gamit ang tila idock ng Mac, ang avant-window-manager, ang mga madalas gamiting applications. Karamihan sa mga ito ang mga online applications. Ngunit huwag madismaya. Ang mga usual ang desktop applications ay matatagpuan pa rin sa gOS. Mag-right click o left click upang lumabas ang menu. O kaya pindutin ang G sa itaas upang lumabas ang menu tulad ng nasa Ubuntu.

Maaring dagdagan ang mga gadgets sa itaas. Maililipat din ang mga gadgets gamit ang shelf configuration.

Matapos mainstall ang una kung tiningnan sa Administration ay kung maaaring magamit ang Ubuntu repositories. Sa synaptic makikitang naka-configure nga ito upang maggamit ang maraming software sa Ubuntu univers, main, etc.

Matapos ang gamitin makikita ang magandang shutdown sequence.


Gamit ang gOS, maaaring makatulong ito upang buhayin ang mga Pentium III na laptop at desktop. Kailangan pa masubukan kung kakayanin ito ng mga Pentium II. Ganundin sa mga computers na may mababang memory. Sa karanasan, ang Ubuntu ay nakakatuwa lamang kapag 512MB at bago ang processors. Kung mag-iinstall sa mga newbies baka mabagot lamang sila. Ngayon maaaring gamitin na ang gOS sa mga ganitong pagkakataon.
Saturday, February 02, 2008
Ubuntu Installfest sa mga Church Workers
Mahigit 30 katao na ang mga gawain ay sa simbahan ang nakilahok sa unang Ubuntu GNU/Linux installfest sa isang paaralan sa metro manila na isinagawa ng Computer Professionals' Union noong Enero 30.

Mga obserbasyon:
1. Iba-ibang specification ng laptop at desktop ang bumulaga sa amin.
2. Halos kalahati ng mga makina ay mababa sa 256 ang memory at lumang mga processors ang nakalagay
3. Iilan lamang sa mga kalahok ang may karanasan mag-install ng operating system.
Paraan ng installfest:
1. Introduksyon sa FOSS at Ubuntu GNU/Linux
2. Pagkakaiba ng Ubuntu GNU/Linux sa proprietary operating system
3. Aktwal ng install fest.
4. Pagkalikot sa bagong install na Ubuntu GNU/Linux desktop
Ilang mga aral mula sa buong araw na installfest.
1. Mahalaga maipaliwanag ang FOSS upang mas yakapin ng audience ang halaga ng pagpapalit ng OS. Dito nakikita nila na hindi lamang teknikal ang hinahabol. Nalalaman nila na may pulitika ring kakabit ang FOSS. Nalalaman nila ang mga isyu ng patents, copyrights at monopolies sa software na hindi kaiba sa maraming monopolyo sa ngayon.
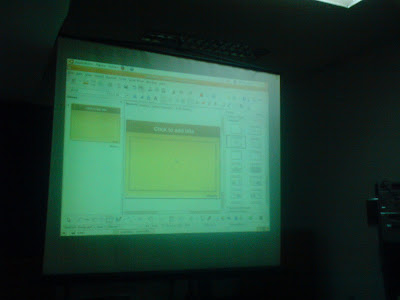
2. Maghanda ng LCD projector. Gumamit ng VMware o anumang virtualization software upang maipakita ang pag-install. Kailangang sabay-sabay na sinusundan ng mga kalahok. Ang mga exceptional na hardware ay balikan na lamang o kaya ay tutukan ng mga assistants.


3. Matapos ang installation, ipakita ang mga software na kasama ng Ubuntu GNU/Linux. I-demo ang kakayahan ng openoffice, gimp, mozilla-browser, rhythmbox at gnome-player.
4. Ipakita kung paano mag-update at mag-install gamit ang synaptic package manager..
5. huwag kalimutan na mula ang Ubuntu sa Debian. Ito ang pinakamagandang demonstrasyon ng free software.
Sa larawan sa ibaba, ilang ubuntu installation ang inyong nakikita? :-)


Mga obserbasyon:
1. Iba-ibang specification ng laptop at desktop ang bumulaga sa amin.
2. Halos kalahati ng mga makina ay mababa sa 256 ang memory at lumang mga processors ang nakalagay
3. Iilan lamang sa mga kalahok ang may karanasan mag-install ng operating system.
Paraan ng installfest:
1. Introduksyon sa FOSS at Ubuntu GNU/Linux
2. Pagkakaiba ng Ubuntu GNU/Linux sa proprietary operating system
3. Aktwal ng install fest.
4. Pagkalikot sa bagong install na Ubuntu GNU/Linux desktop
Ilang mga aral mula sa buong araw na installfest.
1. Mahalaga maipaliwanag ang FOSS upang mas yakapin ng audience ang halaga ng pagpapalit ng OS. Dito nakikita nila na hindi lamang teknikal ang hinahabol. Nalalaman nila na may pulitika ring kakabit ang FOSS. Nalalaman nila ang mga isyu ng patents, copyrights at monopolies sa software na hindi kaiba sa maraming monopolyo sa ngayon.
2. Maghanda ng LCD projector. Gumamit ng VMware o anumang virtualization software upang maipakita ang pag-install. Kailangang sabay-sabay na sinusundan ng mga kalahok. Ang mga exceptional na hardware ay balikan na lamang o kaya ay tutukan ng mga assistants.


3. Matapos ang installation, ipakita ang mga software na kasama ng Ubuntu GNU/Linux. I-demo ang kakayahan ng openoffice, gimp, mozilla-browser, rhythmbox at gnome-player.

4. Ipakita kung paano mag-update at mag-install gamit ang synaptic package manager..
5. huwag kalimutan na mula ang Ubuntu sa Debian. Ito ang pinakamagandang demonstrasyon ng free software.
Sa larawan sa ibaba, ilang ubuntu installation ang inyong nakikita? :-)

Thursday, January 24, 2008
Nice GRUB screens with gfx grub
How to install gfx gub on ubuntu gutsy:
1. sudo apt-remove grub
2. Download themes from this file sharing site.
3. Copy themes to /boot/grub
4. Edit /boot/grub/menu.lst
5. add the following line on the topmost part of menu.lst
6. sudo grub
7. find /boot/grub/stage1
8. use the output in 6 to determine parameters for below.
9. type on the grub shell
10. sudo grub-install /dev/sdaX
Full tutorial can be found here.
1. sudo apt-remove grub
2. Download themes from this file sharing site.
3. Copy themes to /boot/grub
4. Edit /boot/grub/menu.lst
5. add the following line on the topmost part of menu.lst
gfxmenu /boot/grub/message.xyz # where xyz is the theme name that you are going to use
6. sudo grub
7. find /boot/grub/stage1
8. use the output in 6 to determine parameters for below.
9. type on the grub shell
root (hdx,x)
setup (hdx)
10. sudo grub-install /dev/sdaX
Full tutorial can be found here.
Monday, January 07, 2008
Install Ubuntu through PXE network booting
installing ubuntun gutsy through network booting
Requirements:
1. PXE network booting capable hardware. Most recent computers have this capability
2. Ubuntu ISO image
3. Workstation to serve as tftp and boot server
Introduction
1. Installing GNU/Linux in older machine without CDROM
2. https://help.ubuntu.com/community/Installation/Netboot
Guide:
A. Prepare boot server.
1. Install tftpd-hpa, dhcp3-server, netkit-inetd, apache2
sudo apt-get install tftpd-hpa dhcp3-server netkit-inetd apache2
2. Modify /etc/default/tftpd-hpa. Set RUN_DAEMON="yes"
#Defaults for tftpd-hpa
RUN_DAEMON="yes"
OPTIONS="-l -s /var/lib/tftpboot"
3. Mount ISO to /var/lib/tftpboot/ubuntu
sudo mkdir /var/lib/tftpboot/ubuntu
sudo mount -o loop ubuntu-7.10-alternate-i386.iso /var/lib/tftpboot/ubuntu
4. copy netboot files
cd /var/lib/tftpboot/
sudo cp -rfv ubuntu/install/netboot/ .
5. Set-up dhcpd-server. If you have existing dhcp server this may affect new clients. Add the following lines to /etc/dhcp3/dhcpd.conf. Modify according to your network.
INTERFACES="eth1:1"; -->set this to ethN
ping-check= 1;
filename="ubuntu/install/netboot/pxelinux.0";
subnet 192.168.1.0
netmask 255.255.255.0 {
range 192.168.1.6 192.168.1.7;
next-server 192.168.1.5;
}
6. Restart dhcpd and tftpd servers.
7. sudo /etc/init.d/dhcp3-server restart
8. sudo /etc/init.d/tftpd-hpa restart
9. Create symbolic link to apache documentRoot.
cd /var/www/
sudo ln -s /var/lib/tftpboot/ubuntu/ ubuntu
10. Reboot client workstation. Configure its BIOS to boot using PXE network.
11. Install Ubuntu.
12. It is faster than CD install.
References:
1. http://halisway.blogspot.com/2006/06/ubuntu-dapper-pxe-network-install.html
2. http://linuxmini.blogspot.com/2007/10/install-ubuntu-gutsy-over-network-or.html
3. http://wiki.koeln.ccc.de/index.php/Ubuntu_PXE_Install
4. http://www.debuntu.org/how-to-unattended-ubuntu-network-install-dhcp-server-p2
Requirements:
1. PXE network booting capable hardware. Most recent computers have this capability
2. Ubuntu ISO image
3. Workstation to serve as tftp and boot server
Introduction
1. Installing GNU/Linux in older machine without CDROM
2. https://help.ubuntu.com/community/Installation/Netboot
Guide:
A. Prepare boot server.
1. Install tftpd-hpa, dhcp3-server, netkit-inetd, apache2
sudo apt-get install tftpd-hpa dhcp3-server netkit-inetd apache2
2. Modify /etc/default/tftpd-hpa. Set RUN_DAEMON="yes"
#Defaults for tftpd-hpa
RUN_DAEMON="yes"
OPTIONS="-l -s /var/lib/tftpboot"
3. Mount ISO to /var/lib/tftpboot/ubuntu
sudo mkdir /var/lib/tftpboot/ubuntu
sudo mount -o loop ubuntu-7.10-alternate-i386.iso /var/lib/tftpboot/ubuntu
4. copy netboot files
cd /var/lib/tftpboot/
sudo cp -rfv ubuntu/install/netboot/ .
5. Set-up dhcpd-server. If you have existing dhcp server this may affect new clients. Add the following lines to /etc/dhcp3/dhcpd.conf. Modify according to your network.
INTERFACES="eth1:1"; -->set this to ethN
ping-check= 1;
filename="ubuntu/install/netboot/pxelinux.0";
subnet 192.168.1.0
netmask 255.255.255.0 {
range 192.168.1.6 192.168.1.7;
next-server 192.168.1.5;
}
6. Restart dhcpd and tftpd servers.
7. sudo /etc/init.d/dhcp3-server restart
8. sudo /etc/init.d/tftpd-hpa restart
9. Create symbolic link to apache documentRoot.
cd /var/www/
sudo ln -s /var/lib/tftpboot/ubuntu/ ubuntu
10. Reboot client workstation. Configure its BIOS to boot using PXE network.
11. Install Ubuntu.
12. It is faster than CD install.
References:
1. http://halisway.blogspot.com/2006/06/ubuntu-dapper-pxe-network-install.html
2. http://linuxmini.blogspot.com/2007/10/install-ubuntu-gutsy-over-network-or.html
3. http://wiki.koeln.ccc.de/index.php/Ubuntu_PXE_Install
4. http://www.debuntu.org/how-to-unattended-ubuntu-network-install-dhcp-server-p2
Sunday, December 16, 2007
FOSS Seminar in University of Makati
Mahigit sa 100 mag-aaral ng University of Makati ang nakinig sa Introductory Seminar ng Computer Professionals' Union (CPU) tungkol sa Free and Open Source Software. Ang seminar ay bahagi nang naganap na isang linggong selebrasyon (Dec 10-14) ng College of Computer Science inorganisa ng Computer Society .
Nagsimula kame sa pagpapakilala ng CPU (karamihan sa mga impormasyon ay mababasa rin sa website). Ipinakita ng CPU ang ilan nitong mga proyekto lalo na ang karapatan-monitor. Layunin din ng seminar na makapanghikayat ng volunteers para sa nasabing free software project.
Ipinaliwanag sa mga dumalo ang Free software philosophy. Pinalalim ang diskusyon sa pagbabanggit ng pagtutol sa software patents at iba pang panukala ng WTO sa IPR.
Ang mga dumalo ay dinala sa isang demonstration ng mga software na kabilang sa core install ng Ubuntu Gnu/Linux. Ipinaliwanag ang kaibahan ng software na openoffice.org, gimp, firefox, wine sa mga proprietary counterparts ng mga ito.
Lalo silang namangha sa 3d desktop effects na hindi magagawa sa bagong OS ng Microsoft kung kapos ang hardware ng gagamit.
Nagsimula kame sa pagpapakilala ng CPU (karamihan sa mga impormasyon ay mababasa rin sa website). Ipinakita ng CPU ang ilan nitong mga proyekto lalo na ang karapatan-monitor. Layunin din ng seminar na makapanghikayat ng volunteers para sa nasabing free software project.
Ipinaliwanag sa mga dumalo ang Free software philosophy. Pinalalim ang diskusyon sa pagbabanggit ng pagtutol sa software patents at iba pang panukala ng WTO sa IPR.
Ang mga dumalo ay dinala sa isang demonstration ng mga software na kabilang sa core install ng Ubuntu Gnu/Linux. Ipinaliwanag ang kaibahan ng software na openoffice.org, gimp, firefox, wine sa mga proprietary counterparts ng mga ito.
Lalo silang namangha sa 3d desktop effects na hindi magagawa sa bagong OS ng Microsoft kung kapos ang hardware ng gagamit.
change default mysql data directory
1. Create new database directory
sudo mkdir /home/db/
2. change new database directory owner to mysql
sudo chown -R mysql:mysql /home/db/*
3. stop the mysql server
sudo /etc/init.d/mysql stop
4. edit /etc/mysql/my.cnf configuration file
sudo vim /etc/mysql/my.cnf
5. copy the files from /var/lib/mysql/ except ib_arch_log_0000000000, ib_logfile0 etc.
6. All files and directories should be owned by mysql:mysql
7. Restart MySQL service
sudo /etc/init.d/mysql start
ref: DebianAdmin
sudo mkdir /home/db/
2. change new database directory owner to mysql
sudo chown -R mysql:mysql /home/db/*
3. stop the mysql server
sudo /etc/init.d/mysql stop
4. edit /etc/mysql/my.cnf configuration file
sudo vim /etc/mysql/my.cnf
5. copy the files from /var/lib/mysql/ except ib_arch_log_0000000000, ib_logfile0 etc.
6. All files and directories should be owned by mysql:mysql
7. Restart MySQL service
sudo /etc/init.d/mysql start
ref: DebianAdmin
Thursday, December 06, 2007
Webcam in Ubuntu GNU/Linux
We are testing video conferencing solutions using GNU/Linux.
The video capture using webcams is one of the big showstopper. But now, I managed to configure a Creative Live! Cam Video IM webcam in Gutsy.
If you are configuring a webcam, I suggest you go first using gspca driver. This supports a lot of web cams. Unfortunately, for my borrowed webcam it does not.
Below are the steps to configure the webcam using ov51x JPEG hacked linux driver from rastageeks.
1. add the source repository to the /etc/apt/sources.list
# ov51x-jpeg repository
deb http://www.rastageeks.org/downloads/debian binary/
2. Update the apt repositories with $sudo apt-get update
3. apparently, searching for similar drivers in the apt repositories reveals "ov511-source" package exists. I first installed this from the universe but did not worked.
4. Install ov51x-jpeg-source. $sudo apt-get install ov51x-jpeg-source.
5. Proceed to the source directory. $cd /usr/src/
6. Untar the bzipped source. $tar xvfj ov51x-jpeg.tar.bz2
7. We will now build the module. Go to the module source. $cd /usr/src/modules/ov51x-jpeg/
8. Make and install the module using the following command in sequence.
$ sudo make
$ sudo make install
9. Probe and install other relevant module
$sudo modprobe ov51x-jpeg
$modprobe videodev
$insmod ./ov51x-jpeg.ko
10. Done. Launch you web cam application. I used camorama, camstream and ekiga. To install them use synaptic or the classic apt-get install.
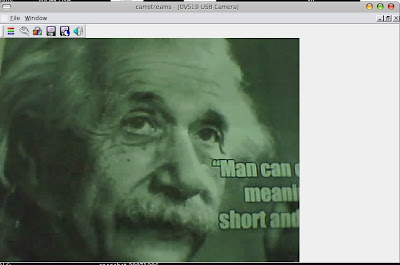
Below are some stills i took. Guess who is my model. :-)

This snapshot was taken using camstream.
The video capture using webcams is one of the big showstopper. But now, I managed to configure a Creative Live! Cam Video IM webcam in Gutsy.
If you are configuring a webcam, I suggest you go first using gspca driver. This supports a lot of web cams. Unfortunately, for my borrowed webcam it does not.
Below are the steps to configure the webcam using ov51x JPEG hacked linux driver from rastageeks.
1. add the source repository to the /etc/apt/sources.list
# ov51x-jpeg repository
deb http://www.rastageeks.org/downloads/debian binary/
2. Update the apt repositories with $sudo apt-get update
3. apparently, searching for similar drivers in the apt repositories reveals "ov511-source" package exists. I first installed this from the universe but did not worked.
4. Install ov51x-jpeg-source. $sudo apt-get install ov51x-jpeg-source.
5. Proceed to the source directory. $cd /usr/src/
6. Untar the bzipped source. $tar xvfj ov51x-jpeg.tar.bz2
7. We will now build the module. Go to the module source. $cd /usr/src/modules/ov51x-jpeg/
8. Make and install the module using the following command in sequence.
$ sudo make
$ sudo make install
9. Probe and install other relevant module
$sudo modprobe ov51x-jpeg
$modprobe videodev
$insmod ./ov51x-jpeg.ko
10. Done. Launch you web cam application. I used camorama, camstream and ekiga. To install them use synaptic or the classic apt-get install.
Below are some stills i took. Guess who is my model. :-)

This snapshot was taken using camstream.

Saturday, November 24, 2007
Convert Ogg Theora Video to avi

I usually record training videos using istanbul desktop capturing tool. The default output format is the free format ogg theora video. But with mencoder (apt-get install mencoder) i created avi version of the videos. However, avi file size is much larger than the original ogg theora video.
use the following command in the terminal to convert from ogg to avi.
mencoder video1.ogg -o out.avi -oac mp3lame -ovc lavc
where
video1.ogg is the input ogg file
out.avi is the output file
mp3lame is the mp3 audio codec
lavc is the video codec
use the following command in the terminal to convert from flv to avi.
mencoder -oac copy -ovc lavc -o video.avi video.flv
Ref: Ubuntuswitch
mypapit
Sunday, October 21, 2007
Upgrade Feisty Fawn to Gutsy Gibbon on December of later
I just finished reinstalling feisty fawn version of ubuntu and will stick with it until the next release on April 2008 or early next year. I am a bit frustrated with the lack of thorough tests of the upgrades from feisty to gutsy.
For some reasons HAL, DBUS and GDM are running against each other on who will first to wake up upon boot. Unfortunately DBUS can not catch up with the two even with changes in the rc scripts. This error made me idle the whole night yesterday and until earlier when feisty was installed.
If you experience this same problem there are lots of suggestions in launchpad but nothing worked for me.
Hal failed to initialize
This link suggests:
but you can only do this when the recovery kernel is used during boot-up.
There are other suggestions in google but all following the above directions.
For upgraders, specially if you would not want to mess with the console, I suggest that we wait for a couple of months after this release and have ubuntu update the errors so we can happily do an apt-get update; apt-get dist-upgrade. But if your excited with the new things in gutsy just do a clean install of the version.
I have not experience these things in debian upgrades on my servers.
For some reasons HAL, DBUS and GDM are running against each other on who will first to wake up upon boot. Unfortunately DBUS can not catch up with the two even with changes in the rc scripts. This error made me idle the whole night yesterday and until earlier when feisty was installed.
If you experience this same problem there are lots of suggestions in launchpad but nothing worked for me.
Hal failed to initialize
This link suggests:
okay after reading the above mentioned bug report it would appear that Dbus needs to start before Hal and GDM last. so the oder would be
Dbus-->Hal-->GDM
With a fresh install of Gutsy I looked in the "/etc/rc2.d/" folder and found
S12Dbus
S12hal
S30GDM
So I renamed S12hal with
'sudo mv /etc/rc2.d/S12hal /etc/rc2.d/S13hal'
Then I did a
Sudo Reboot
but you can only do this when the recovery kernel is used during boot-up.
There are other suggestions in google but all following the above directions.
For upgraders, specially if you would not want to mess with the console, I suggest that we wait for a couple of months after this release and have ubuntu update the errors so we can happily do an apt-get update; apt-get dist-upgrade. But if your excited with the new things in gutsy just do a clean install of the version.
I have not experience these things in debian upgrades on my servers.
Friday, October 05, 2007
CUPSYS error during upgrade
encountered this error below? cupsys is complaining during installation...
++++++++++++++++++++++++++++++++++++++++++++++++++++++++++++++++++++++++
WARNING: The following packages cannot be authenticated!
cupsys
Install these packages without verification [y/N]? y
Preconfiguring packages ...
(Reading database ... 256527 files and directories currently installed.)
Preparing to replace cupsys 1.3.2-1ubuntu1 (using .../cupsys_1.3.2-1ubuntu4_i386.deb) ...
Ignoring nonregistered document cupsys
* Stopping Common Unix Printing System: cupsd [ OK ]
Unpacking replacement cupsys ...
dpkg: error processing /var/cache/apt/archives/cupsys_1.3.2-1ubuntu4_i386.deb (--unpack):
trying to overwrite `/usr/share/doc/libcupsys2/CREDITS.txt', which is also in package libcupsys2
dpkg-deb: subprocess paste killed by signal (Broken pipe)
* Starting Common Unix Printing System: cupsd [ OK ]
Errors were encountered while processing:
/var/cache/apt/archives/cupsys_1.3.2-1ubuntu4_i386.deb
E: Sub-process /usr/bin/dpkg returned an error code (1)
++++++++++++++++++++++++++++++++++++++++++++++++++++++++++++++++++++++++
to solve just run sudo dpkg -i --force-overwrite /var/cache/apt/archives/cupsys_1.3.2-1ubuntu4_i386.deb
++++++++++++++++++++++++++++++++++++++++++++++++++++++++++++++++++++++++
WARNING: The following packages cannot be authenticated!
cupsys
Install these packages without verification [y/N]? y
Preconfiguring packages ...
(Reading database ... 256527 files and directories currently installed.)
Preparing to replace cupsys 1.3.2-1ubuntu1 (using .../cupsys_1.3.2-1ubuntu4_i386.deb) ...
Ignoring nonregistered document cupsys
* Stopping Common Unix Printing System: cupsd [ OK ]
Unpacking replacement cupsys ...
dpkg: error processing /var/cache/apt/archives/cupsys_1.3.2-1ubuntu4_i386.deb (--unpack):
trying to overwrite `/usr/share/doc/libcupsys2/CREDITS.txt', which is also in package libcupsys2
dpkg-deb: subprocess paste killed by signal (Broken pipe)
* Starting Common Unix Printing System: cupsd [ OK ]
Errors were encountered while processing:
/var/cache/apt/archives/cupsys_1.3.2-1ubuntu4_i386.deb
E: Sub-process /usr/bin/dpkg returned an error code (1)
++++++++++++++++++++++++++++++++++++++++++++++++++++++++++++++++++++++++
to solve just run sudo dpkg -i --force-overwrite /var/cache/apt/archives/cupsys_1.3.2-1ubuntu4_i386.deb
Wednesday, September 26, 2007

Saturday, September 01, 2007
Upgrading Ubuntu Feisty to Ubuntu Gutsy
I experimented the upgrade process for Ubuntu on my Gateway laptop. Being a Debian user until now on servers, upgrades from stable to testing to sid are smooth process in Debian. I seldom experience glitches.
I wanted to find out if this will be a smooth process also for Ubuntu. I was running Debian on the Gateway laptop until May this year. When I installed Ubuntu during the national elections (to eliminate incompatibilities in the system we used for the quick count), I am yet to return to Debian.
To upgrade to Gutsy follow the following process. On your terminal issue the following command.
1. sudo apt-get update
2. sudo apt-get upgrade
3. gksudo "update-manager -d"
In Debian, you just have to change the /etc/apt/sources.list to the version you want to upgrade. The first two commands will be enough to have a smooth upgrade. The last command will launch the gui for the software upgrade. Just accept default answers by the updater. You will eventually see this figure.

The updater will now start.

After fetching some tools and scripts, start the upgrade on this window.

There will be several steps. But the gui updater will handle smoothly.

After a long download, installation will begin. It took me 2 early morning days to download all packages. I do have several apps in use.

I checked all apps and all are also working properly. Sound and video is not a problem.

A nice applet for the power management is also available. But no hibernate support yet. At least for my laptop. In Feisty, i was able to use hibernate for a few weeks and an upgrade broke everything. It is still broken now in Gutsy.

The best part though, compiz-fusion works well. The animations and desktop cubes are rendered smooth to the eye.
If you are brave enough, try gutsy now.
I wanted to find out if this will be a smooth process also for Ubuntu. I was running Debian on the Gateway laptop until May this year. When I installed Ubuntu during the national elections (to eliminate incompatibilities in the system we used for the quick count), I am yet to return to Debian.
To upgrade to Gutsy follow the following process. On your terminal issue the following command.
1. sudo apt-get update
2. sudo apt-get upgrade
3. gksudo "update-manager -d"
In Debian, you just have to change the /etc/apt/sources.list to the version you want to upgrade. The first two commands will be enough to have a smooth upgrade. The last command will launch the gui for the software upgrade. Just accept default answers by the updater. You will eventually see this figure.
The updater will now start.
After fetching some tools and scripts, start the upgrade on this window.
There will be several steps. But the gui updater will handle smoothly.
After a long download, installation will begin. It took me 2 early morning days to download all packages. I do have several apps in use.
I checked all apps and all are also working properly. Sound and video is not a problem.
A nice applet for the power management is also available. But no hibernate support yet. At least for my laptop. In Feisty, i was able to use hibernate for a few weeks and an upgrade broke everything. It is still broken now in Gutsy.
The best part though, compiz-fusion works well. The animations and desktop cubes are rendered smooth to the eye.
If you are brave enough, try gutsy now.
Wednesday, July 04, 2007
Debian and Ubuntu
I learned Gnu/Linux by being brave enough to install redhat 6 on an amd k62 machine. I would later replaced it Mandrake back then. Mandrake will be on that machine for about three years. But while I was working with rpm-based distro my heart was really to learn Debian. I was attracted with its Debian Social Contract.
My first Debian install will be woody on a pentium 1 machine. It was a great. Enlightenment was the default desktop environment during those years. I would later work on a internet infrastructure company and my first full install of debian started. Until now it is debian on my desktop and during the first months of my first laptop.
Two months ago, during the release of feisty fawn, i tried installing it and was surprised with may automagic configuration. This is the start of my ubuntu adventure. Coming from debian, all debian knowledge is still available in ubuntu since it is debian-based.
But still i have Debian testing on servers i manage. Ubuntu is on my laptop and Debian on servers. there shouldnt be any conflict.
Anyways, a friend pointed me to this list of repositories for feisty.
deb http://hendrik.kaju.pri.ee/ubuntu feisty screenlets
My first Debian install will be woody on a pentium 1 machine. It was a great. Enlightenment was the default desktop environment during those years. I would later work on a internet infrastructure company and my first full install of debian started. Until now it is debian on my desktop and during the first months of my first laptop.
Two months ago, during the release of feisty fawn, i tried installing it and was surprised with may automagic configuration. This is the start of my ubuntu adventure. Coming from debian, all debian knowledge is still available in ubuntu since it is debian-based.
But still i have Debian testing on servers i manage. Ubuntu is on my laptop and Debian on servers. there shouldnt be any conflict.
Anyways, a friend pointed me to this list of repositories for feisty.
deb http://hendrik.kaju.pri.ee/ubuntu feisty screenlets
Subscribe to:
Posts (Atom)


